Where it All Begins
- meetthemeese

- Oct 12, 2020
- 8 min read
Updated: Oct 15, 2020
[WARNING: Image-heavy post]
Now that we've got the software in place, the best way to get started with learning how to use it (in my opinion) is to actually start using it! This series of tutorials is going to be a walk-through of the development of a simple, short game on RM2K. It'll cover just the basics, to get you started on your own.
I'll be using the story of a chicken in search of his kidnapped best fish friend as the basis of the game I will build. You don't need to stick to that per se. Feel free to just focus on the actual demos of the different things that will be used (such as switches and variables).
This set of tutorials is aimed at the absolute beginner. Not out of the goodness of my heart, but because I barely know much about using RM2K myself lel.
Today's introductory stock image is of someone tying their shoelaces.

Now with that dose of rare wisdom out of the way, let us begin.
Open up your application, and go ahead and create a new project (menu on the top left).


Easy-peasy.
Immediately, you'll have a blue screen opening up on the editor, with a colourful panel to the left. Here's a quick rundown of the editor layout-

1 - At the very top you'll find a toolbar with a bunch of nifty buttons we'll be using a lot.
2 - The colourful panel on the left is where the tileset is displayed. These are all the tiles you can use to draw out your map.
3 - This little box has a tree of all the maps you have so far (every new game has 1 map by default)
4 - The vast blue sea taking up most of the screen is where you'll draw your maps.
Yes, you get to literally draw them with these fancy pictures from the tileset how fun is that?! Being from an IT background (and not being very good at it (hehe, pun)), I'm always blown away by how much effort must have gone into making something as visual and easy to use. And this was 2 decades ago.
A closer look at the toolbar might be useful at this point-
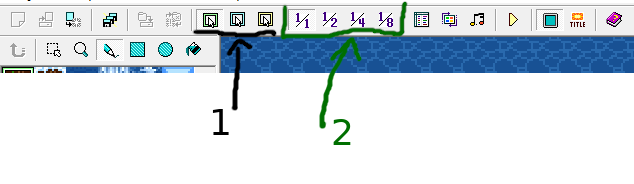
An even closer look at the toolbar-

Particularly useful to know are the layer buttons (1) and the zoom buttons (2). We'll be using them a lot.
RM2K allows you to build out your map in 3 layers -
The background - the ground and trees, walls; the, you know, background.
The foregorund - objects that are typically at the same level as the hero/player, things that the player can interact with.
The events layer - this is the only layer where you can add all your game events, and one of the two places in all where you can add events.
More on events when we reach that point. Let's focus on just the drawing layers (background and foreground) for now (because they're fun).
The tileset on the left is where you can pick up your brush design and start drawing. I encourage you to just pick something and begin drawing on the blue screen for a while, you might be surprised by how they look.
A tileset has the first few rows fixed for special tiles, and the rest of it is as it seems. The first row will be all the animated tiles, and the next two rows will be landscaping ones (called auto-tiles). These draw out a little differently than the others.
And then there's the suspiciously out-of-place tile riiight at the bottom.

That's special too. It is nothing. It paints on nothingness. It is the void.
Any areas you use that tile on become transparent, and any backgrounds you've used on the map will show through. We'll be doing that too.
Aight, let's begin!
ACT I, SCENE 1: A Grave Mistake
Step 1: Landscaping is an art
I'm going to start with making the map of the area where our chicken lives. Let's give him a quaint little hut or something. Whatever we can get from the default tileset on the left, really. I urge you to use your own creativity with the design as, you'll soon see, mine is lacking.
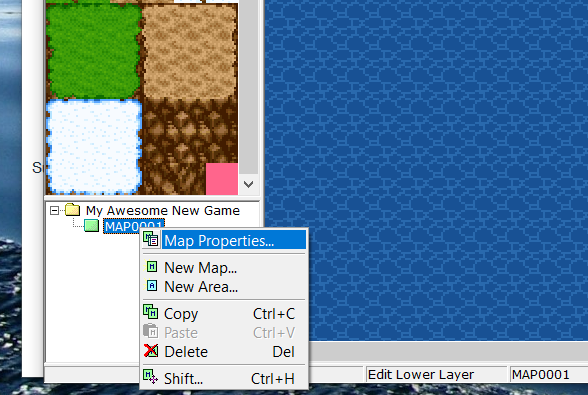
Before that though, I'm going to reduce the map size drastically. Going to the map tree (area no. 3 on the editor layout image a few paragraphs above), I can right-click the map and set its size in the 'properties' menu item.

The tileset dropdown shown here is incidentally the set of tiles we have on the left panel. Leave it at Basic for now.
I'm going to be using the first 2 grassy tiles and the last, light coloured tile to draw out sandy areas. Draw out the landscape, basically. Go crazy with it! Everything in the second and third rows (except for the last 2 dark squares in row 3) can be used for the background landscaping.

Just a note - remember the toolbar image from earlier? The 3 layer buttons? We're on the first one (the background layer). In case you're not sure where my screencaps of the tileset are coming from, just make sure the first layer is selected.

Landscaping done! I added a few trees/bushes at the *ahem* horizon as well, and used the Void tile wherever there is no land (because our chicken lives atop a hill). I'll add the sandy areas once I've put the house in place.

I don't really like how it looks at the 'horizon', where the green meets the Void. So to make the lines a little less flat, I'm using the green tiles from the bottom of the tileset (closer to the Void tile) along much of the edge.


A couple of tips- you can right-click on the map screen to select any tile directly from the map. You can also right-click and drag to select a larger area to copy.

I gave the chicken a little hut next, and wow the basic tileset is pretty limited (as is my imagination). Ended up using what looks like the tiles for a wooden bridge or walkway. Technically, this would make the hut walls walkable as well, but we'll get to that part about tiles in a later post.

I'm going to leave this as is for now, and move on to adding the background image (of the sky) to the map. Right-click on the map in the tree again, choose 'map properties'. Check the 'Background' box under parallax background, and set your background of choice.

You have the option to animate the background too. Selecting either 'loop horizontally' or 'loop vertically' will cause the background to move as your character moves (but at a different speed from your character). Auto-scroll values will cause the background to scroll regardless of character movement.

Now's a good time to just do a quick run of the game, I think, and see how our character looks and walks on the screen.
Wait, what character, you ask?
Step 2: Choosing your heroes
Let's head back to our tool bar. The icon circled in red and labelled '1' is the database. This is where the entirety of our game settings reside, right from the heroes and their stats, to spells and items available in-game and even what the end-game screen looks like.

The circled icon labelled '2' is the music editor. You can use it to preview the audio that can be used in your games! It runs in an endless loop, so you can play it in the background while you work on the map, if you'd like; it can help set the mood for your work sometimes (the default music is all cheesy as heck though).
For now, let's open up the database, and add a few of our in-game settings.
You might find that it opens up on the 'Tilesets' tab. We'll skip that for the moment and go to the very first tab - 'Actors'. That's where we can choose our heroes.

As we can see, the game engine helpfully fills everything up with some default settings that can be used to build a complete RPG world with. The layout looks a wee bit different in Don's rip, but you'll find all the same setting options. A quick explanation of each of the numbered parts -
We see the list of default 'Actors'- these are all the characters that can be used by the player in the entire game. This is not your starting party, but your starting party can only be from this set of characters. Click on a name in this list to edit that character's information in the rest of the panels on the screen.
This button helps you increase or decrease the number of playable characters you can have in your game.
This panel helps us set up some basic information about each character. Here is where we'll be able to set our character graphics as well.
These are a few additional options for the selected character - dual-wield => 1 weapon in each hand, instead of the default sword+shield wield style; auto-battle => the character is controlled by AI, not the player; fixed equip => the character's equipment cannot be changed by the player; and Mighty-Guard => the character is a tanking type, with strong defence. We also see something called the 'Experience curve' which determines how fast or slow the character levels up. The default works pretty well.
Here you can set the in-game starting level of the character. This means that whenever your character joins your party, it will do so at this level (unless you have a custom XP system that gives XP to non-fighting characters as well). Critical-rate determines how often your character gets a critical hit in against the opponent. The parameter curves let you set the stats for your character at the chosen initial level. The graphs' growth curves are determined by the experience curve settings in panel 4.
These are all the equipment the character will have initially. The equipment in the lists is tied to the database's default list of in-game equipment. This default list can be changed entirely, of course, but there is a separate tab on the database for it ('Items'). Here you can also select the animation that plays out when your character fights a monster without any weapons. These animations can be previewed on the right hand side of the 'Skills' tab.
The list of skills the character learns, and at what level they learn it. The 'Command Name' is the label for all these skills that shows up on the battle menu. It defaults to 'Skills'.
Their susceptibility to the in-game status effects (A->E, with E being 'most susceptible/highest degree of weakness against').
Their susceptibility to different elements.
Phew! That was a lot of explaining. I feel like I've said that somewhere else on this post (which, incidentally, is getting way too long). I'll be starting my game with just the chicken, so I'll go ahead and set that up.

I've deleted most of his 'skills' (right-click on the skill -> delete). You can add skills by double-clicking on an empty row (in either the level or the skill columns).
I'm going to go back to the map properties from the map tree, and select an background tune for this map.
The final touch, before we can run a test playthrough of this game screen, is to add the point on the screen where our character starts the game from. Hark back to the layers button. Pick the 3rd one ('Events layer'). You'll see all these black grid lines turn up. Right-click on any tile where you want your character to start from (bear in mind that this should be a walkable tile- if you're using the default basic tileset, that means anywhere that you've put your grass or sand. If you're using a custom one, same thing- anything that logically looks like it's made for walking will be a walkable tile; they'll be in the 2nd and 3rd rows usually, even in custom tilesets). Select 'set starting position', and that's it!

Something else I did, which you might find useful too unless you're still using an ancient CRT monitor with a 600x480 resolution, is turn off the 'full-screen' mode from the toolbar.

Once that's done, hit the 'Play' button that's right next to the full-screen button, and rejoice! You've (technically), got most of the the visual basics of the game down!

At his point, you might get a little surprised by where your character is and is not able to walk. Finding out the walkable areas from your tileset (and even editing this aspect of the tiles) will be covered in the next post.
I think this is a good place to end this post. With the hero start position set, it's easy to fiddle around a bit more with the map design and see how it looks with a test play. Especially the animated tiles.
Please post screenshots of your own screen in the comments! I'd like to see them very much.
In the next post, I will cover the remainder of the visual basics, including the 'Tilesets' tab of the database.
Soon,
The Reject Moose


Comments