iNtErMiSsIoN – A Monstrous Detour
- meetthemeese

- May 22, 2021
- 8 min read
Updated: Oct 6, 2022
Upon re-reading my previous post, I realised that it was a little bit lacking in details. So this short post will try to make up for that by detailing an example custom monster.
If you're already comfortable creating monsters, or don't care to get into the details of that right now, then you can directly head over to the next post on Monster parties/Troops (scroll to the end of this post, then scroll a little bit lower, and you'll see orange links to the next (and previous) post. If you don't see a link for the next post, then that means I've not posted it yet lel).

Our Very Own Frankencreation
Let's get right into creating a new monster!
Open the Monsters/Enemies tab in the database, and increase the maximum number of monsters in the list.

We're going to create our custom monster in this new slot. I've decided to make a random low-to-mid-level monster (not a boss) with a specific attack pattern – when it's at 20% HP or less, it will either self-destruct, or it will heal itself.
So here's a screenshot of the major settings -

NOTE: If you would like to use a sprite other than what comes with the default RTP, you can import it into your game's library (some of the links in the 'Download'/resource list post will have such monster sprites). Go to Tools -> Resource Manager, or click on the Resource Manager icon in the toolbar, select the 'Monster' folder from the left, and click the 'Import' button on the right to choose and add your image into the game's library. Alternatively, you can just copy-paste the file directly into the Monsters folder in the RTP, but sometimes that breaks things.

You'll see a new dialog open up, and the background colour of the image will be flashing. If you don't see the flashing, click on the background colour to select it, and it should start flashing now. What this tells RM2K is that the background colour should be made transparent (all your sprites must be PNG files).

How To Figure Out A Starting Point For Monster Stats
There are many ways to do this. The easiest way is to copy the stats from one of the default monsters of the appropriate level and just tweak them a little to your liking.
The second way is what I do in order to waste as much time as possible not building my RPG's story progression, and that's what I describe next.
Getting to the main settings – the HP, DEF and other stats I've chosen are normal, nothing out of the ordinary. To gauge what stats might be good enough for a mid-level fight, check what your player's stats are like mid-level. So for example, let's say I want this monster to be fought when Chester is between levels 20 and 26, I can go to the 'Actors' tab in the database and check out what Chester's stats are at levels 20 and 26.
Double click any of the parameter curves, then enter a level to see the corresponding value for the character right below.


I can see Chester's stats at the 2 levels are – HP: 206, 276, ATK: 62, 81, DEF: 50, 65.
I'm going to take the approximate average of each, so HP: 241, ATK: 72, DEF: 58, and use these as starting points for my enemy's own stats. In fact, I think I'll knock a few points off each to begin with, as it's anyway an ordinary enemy, and I don't want it to be too difficult for the player to defeat it. For starters, I'll stick with making the enemy's MND and AGI/SPD stats 5 points less than Chester's at level 20.
So with these new main enemy stats – HP: 230, ATK: 68, DEF: 54, I will -
Set up the enemy with a basic attack pattern for now
Set up a troop/Monster Party with a single instance of this enemy
Run a battle test and see how my level 20 and level 26 chicken (with initial equipment only) fares against this new creature.
Optional - Run a battle test and see how my level 20 and level 26 chicken (with a mid-range weapon and shield and accessory) fares in the fight. I say optional, because it's very likely you might not have a proper weapons tree in place right now, so we can just skip this for the moment, and tweak the stats any time later.
Remember, the battle tests should ideally resemble the part of the game in which the player encounters these enemies. What I mean is, use the same party size in the test that you anticipate would be the size of the party in your actual game at the point where the player begins encountering this enemy. In our demo so far, there's just 1 hero – Chester. So that makes things a lot less complicated for us.


Halfway through my first lvl20 battle test, I can already see I'm getting my behind whooped; the enemy is pretty strong for a non-boss type (but not strong enough – I'm fighting it using only my initial-level equipment). I can cause an average physical damage of 18 to the enemy, while the enemy causes an average of 21 damage to me. This is understandable, as at lvl20, Chester is in fact weaker than the enemy.
Before adjusting anything though, I want to test with lvl26 first.


I can immediately see a huge difference. For one, I don't die 5 turns in; for another, I can defeat this enemy at lvl26 with only physical attacks without having to heal once, and with losing less than half my HP. Remember, I still only have my initial equipment on. During the actual game, my player would obviously have equipment that will make them stronger. The average damage I took was reduced to 18, while the average damage I caused was 28. Considering that fact, I should ideally increase the enemy's stats even higher and re-test at lvl20 and lvl26.
Basically, I've already got my starting point for monster stats. From here on, it's going to be just making adjustments until I'm getting my behind whooped at lvl26 as well (with initial weapons).
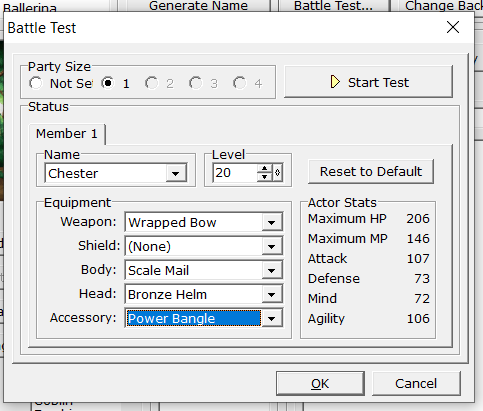
Remember how I said testing with mid-range weapons was optional at this stage? It still is, but for the purpose of demonstration, I'm going to pick some default mid-range weapons and accessories and re-test. Based on how easy it was to defeat the enemy at lvl26 (with initial weapons), I can safely raise the stats of my monster to something similar to that of lvl26 Chester.
So my first adjustments are - HP: 276, ATK: 81 and DEF: 65. I'm leaving MND and SPD as is, because they're not particularly important stats for a pure physical-attacking plain-Jane monster like the one I'm setting up.
I'm equipping Cheesy Boy with the following 'mid-range' weapons from the defaults in the database (these are from the official RM2K translation) - Wrapped Bow (ATK40), Scale Mail (DEF15), Bronze Helm (DEF8) and a Power Bangle (ATK5). Using these in your own games is pointless unless you are using the default weapons themselves, or weapons with similar stat ranges, hence why this is optional at this point.
The average damage caused now was 35, while the average damage taken was 20. I could finish it with only physical attacks and with 1/3rd HP still left. For lvl20 Chester, this is too easy, but that's really just my preference. I would prefer to either hike up the enemy's HP significantly to make the battle a bit longer, or I would increase the attack and/or defense to make the battle a bit more difficult. Doing so would also ensure that lvl26 Chester is unable to wipe the floor with the monster in battle, but hey, some developers would want that.
It's all up to you, whether you want the monster to still be a bit of a challenge over 6 level-ups for your player, or just over 2 to 3 level-ups. But this is the way I prefer calibrating my monsters.
(Of course, none of this replaces a thorough test of the game once an initial version of it is finished.)
With these results in place, I'm reverting the enemy stats to the first set I started with, because I'm not going to be using all those fancy, powerful weapons in the demo anyway hahahaha....ha.
There are certain other changes that can be made still, even before the optional battle test we just ran here. We can adjust element and state rates (such as resistant to Ice magic and Spear attacks, weak to Holy magic etc.), along with stats to make them conform to some archetype. For example, I could make this enemy very strong in magic, but consequently reduce their HP and DEF to balance out the higher damage output they would now have.
For this example, I'm not going to make any such adjustments, just to keep things simple.
No matter whether you want to run the optional battle tests or not, while you're still new to the whole thing, I'd recommend starting out with a base set of stats that's roughly the average (as calculated above) because it's easier to tweak from there.
Setting Up The Attack Patterns
Let's start with creating the actual attack behaviour of our enemy. I'm not going to give it any magic, except for the healing spell it uses when its HP is 20% or less.
So the first attack in the list is going to be a 'Normal' attack (which will already be included by default)
The second will be the healing spell. We need to set the Conditions Type as Monster HP, and put 0 and 20 as the two values (0% or above, 20% or below => 0 to 20%)

The third will be the self-destruct option. Same condition settings as the healing spell.

I don't want the enemy to self-destruct too often, so I'm setting the priority of the healing spell to a number higher than the self-destruct option.
NOTE: If you want to see how strong individual attacks are, leave them all at the same priority and 'Always' condition and run a few test battles first.
One thing to remember is that the priority rating does not reflect an exact probability. This means if you have an attack with priority 70, and another attack with the same conditions and with priority 30, this doesn't mean the first attack will be executed 70% of the time and the second attack 30% of the time. There's a lot more hocus-pocus going on under the hood to determine the attack that will get picked finally.
We don't need to worry about the details though, we can still set up a lot of interesting patterns. If we want the machine to choose between a set of commands on certain conditions (such as the heal vs. self-destruct at <=20%HP in this example), then we need to make sure the difference between the lowest and highest priority attacks in the set is not more than 9. This is because, as the help doc says, once the attack conditions are satisfied, the game engine will pick the relevant attack with the highest priority, along with all other attacks which have the same conditions as this and are within 9 priority points, and then finally select one attack from this set. The higher priority attacks still get chosen more often, but how often is not something we can set.
All we need to remember is the magic number 9, and that the game engine introduces some kind of unpredictability in battles which is out of our control (and that's good!).
Anyway, here's the final setup -

I hope this example helps give you ideas for how you can create fun and interesting enemy behaviours in battle.
When you have multiple characters in your party, and/or multiple monsters in the troop, things might seem more complicated, but they aren't! Just start with one character, one monster, and then scale up, run battle tests and adjust. Once you have the starting point set with one-character-one-monster, you can intuitively and easily make adjustments from there with just going through test battles!
Next post, we'll get back to what I was supposed to have posted today - troops/monster parties.
Until later,
-Meester Raindrop


Comments